In this tutorial, we will look into how to set up PhpStorm to use Xdebug in a dockerized PHP project. For a non-trivial PHP project example, we choose the development of a WordPress theme.
Table of Contents
Prerequisites
PhpStorm is a popular PHP IDE with many useful features including Docker and Xdebug support. In this tutorial, we are using version 2019.3.2.
You will need the Xdebug helper for Chrome or an equivalent helper for other browsers.
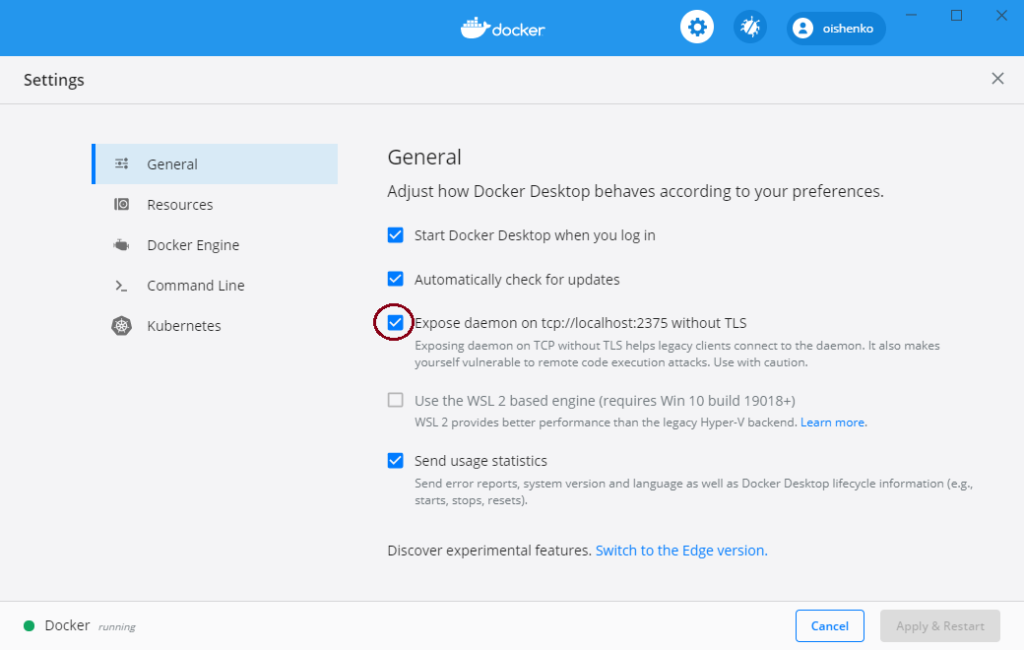
This tutorial is written for Windows 10 and Docker Desktop running Linux containers. Make sure the Docker Daemon is exposed on port 2375. To check if it is, go to Settings > Generaland tick the respective checkbox:
The version of WordPress we are going to work with is 5.4.1. It should work also with newer versions: download the most recent WordPress and update the reference to the newer WordPress Docker image in the Dockerfile that is mentioned below.
The WordPress theme that is the subject of this development project can be a scratch-built custom one or a modification of an existing theme. For simplicity’s sake, we will be debugging an existing theme BeOnePage Lite by BeTheme.
The companion repository for this tutorial can be found on GitHub: wordpress_xdebug
Project Setup
The project will use a container built from an official WordPress image. The tag used in this project is 5.4.1-php-7.2-apache.
In an empty project folder, we create a docker-compose configuration file, docker-compose-local.yml. In this file, we define two services. The first one is for the database server:
  db:
    image: mysql:8.0
    container_name: db_blog_xdb
    restart: unless-stopped
    env_file: .env
    environment:
      MYSQL_ROOT_PASSWORD: $MYSQL_ROOT_PASSWORD
      MYSQL_USER: $MYSQL_USER
      MYSQL_PASSWORD: $MYSQL_PASSWORD
      MYSQL_DATABASE: $DB_NAME
    ports:
      - 42333:3306
    volumes:
      - dbdata:/var/lib/mysql
    command: '--default-authentication-plugin=mysql_native_password'
    networks:
      - app-network
file docker-compose-local.yml, line 4
This is a simple database service configuration that uses an official MySQL image. It reads environment variable values from the .env file and maps to the host port 42333 to allow MySQL clients that run on the host machine to connect to the database.
The second service runs the WordPress code:
wp:
    depends_on:
      - db
    build:
      context: ./
      dockerfile: Dockerfile_local
    container_name: wp_blog_xdb
    restart: unless-stopped
    env_file: .env
    ports:
      - "80:80"
    environment:
      WORDPRESS_DB_HOST: db:3306
      WORDPRESS_DB_USER: $MYSQL_USER
      WORDPRESS_DB_PASSWORD: $MYSQL_PASSWORD
      WORDPRESS_DB_NAME: $DB_NAME
      XDEBUG_CONFIG: remote_host=host.docker.internal
    volumes:
      - ./src/wordpress:/var/www/html
      - ./src/themes/beonepage:/var/www/html/wp-content/themes/beonepage
    networks:
      - app-network
file docker-compose-local.yml, line 22
The build instructions for this image will be available in a separate Dockerfile. Note that we bind two project directories as volumes: ./src/wordpress/ for the core WordPress files and ./src/themes/beonepage that hosts the files for the custom theme.
We place the core WordPress files into a separate directory so that we could exclude it from the repository using .gitignore. We do not need the core files to be deployed live from the repository, because they will be provided by a WordPress official image that will be the basis for the live version of the container. But in the development environment, we still need the core files in the project to step into them when debugging.
The .env file is used by both services contains variables and is required for the MySQL operation. This file’s content is simple:
MYSQL_ROOT_PASSWORD=password
MYSQL_USER=db_admin
MYSQL_PASSWORD=password
DB_NAME=my_blog_db
file .env
The full content of the docker-compose-local.yml file is this:
version: "3"

services:
  db:
    image: mysql:8.0
    container_name: db_blog_xdb
    restart: unless-stopped
    env_file: .env
    environment:
      MYSQL_ROOT_PASSWORD: $MYSQL_ROOT_PASSWORD
      MYSQL_USER: $MYSQL_USER
      MYSQL_PASSWORD: $MYSQL_PASSWORD
      MYSQL_DATABASE: $DB_NAME
    ports:
      - 42333:3306
    volumes:
      - dbdata:/var/lib/mysql
    command: '--default-authentication-plugin=mysql_native_password'
    networks:
      - app-network

  wp:
    depends_on:
      - db
    build:
      context: ./
      dockerfile: Dockerfile_local
    container_name: wp_blog_xdb
    restart: unless-stopped
    env_file: .env
    ports:
      - "80:80"
    environment:
      WORDPRESS_DB_HOST: db:3306
      WORDPRESS_DB_USER: $MYSQL_USER
      WORDPRESS_DB_PASSWORD: $MYSQL_PASSWORD
      WORDPRESS_DB_NAME: $DB_NAME
      XDEBUG_CONFIG: remote_host=host.docker.internal
    volumes:
      - ./src/wordpress:/var/www/html
      - ./src/themes/beonepage:/var/www/html/wp-content/themes/beonepage
    networks:
      - app-network

volumes:
  dbdata:

networks:
  app-network:
    driver: bridge
Xdebug Installation
For the service wp, we need a custom image based on WordPress docker image tagged 5.4.1-php7.2-apache. We name the Dockerfile Dockerfile_local and add instructions there that install and enable the Xdebug extension:
FROM wordpress:5.4.1-php7.2-apache
RUN pecl install xdebug-2.6.0
RUN docker-php-ext-enable xdebug
RUN echo "xdebug.remote_enable=1" >> /usr/local/etc/php/php.ini
file Dockerfile_local
WordPress Source Code
As mentioned above, we will need the source code for WordPress in our project to step into code when debugging. In the project directory, create a path src/wordpress. Download WordPress version 5.4.1 and place the extracted files there, so that the main index.php and directories wp-admin, wp-includes are available directly under src/wordpress.
Next, in the src/ directory add a subfolder themes and place there the extracted BeOnePage theme so that the theme’s files are available under src/themes/beonepage
Finally, exclude all directories that we are not going to need in the project repository by adding the .gitignore file into the project root:
.idea/
.env
src/wordpress/
The final project structure will look like this:
├── src
│ ├── themes
│ │ ├── beonepage
│ ├── wordpress
│ │ ├── wp-admin
│ │ ├── wp-content
│ │ ├── wp-includes
│ │ ├── index.php
│ │ ├── ...
├── .env
├── .gitignore
├── docker-compose-local.yml
├── Dockerfile_local
Launching the Docker Project
We are now ready to launch the prepared WordPress project using PhpStorm Docker tools.
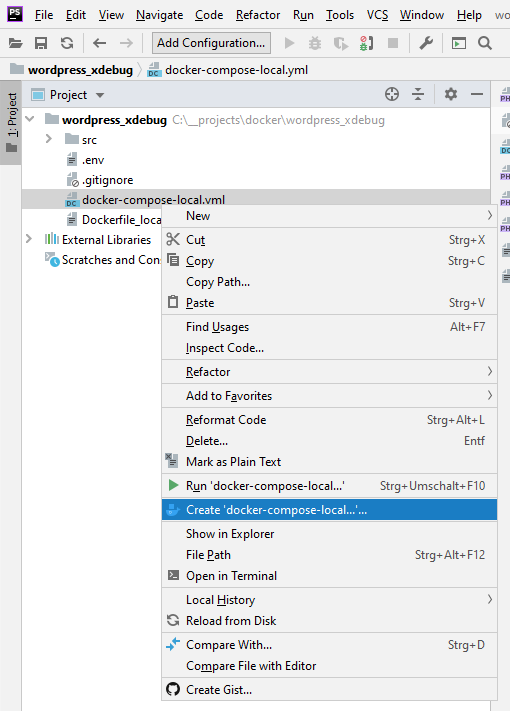
First, we need to create a Run Configuration. To do that, in the project view right-click the file docker-compose-local.yml and select “Create docker-compose-local…”:
This will open the “Create Run Configuration” dialog that looks like this:
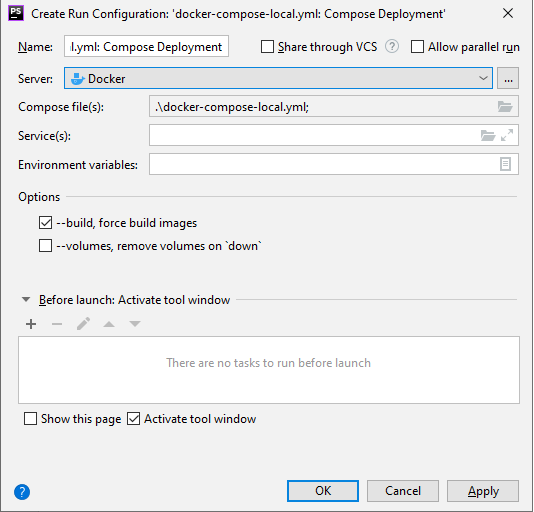
For our project, there is nothing required to change in this dialog. However, you might want to check “–build, force build images” if your project has some changes that can affect the composition of the services’ images.
Possible Problems
If the “Server” setting does not show “Docker”, it means that PhpStorm can’t connect to the Docker daemon. The error message can read, for example:
“Cannot connect: Cannot connect to the Docker daemon at tcp://localhost:2375. Is the docker daemon running?”
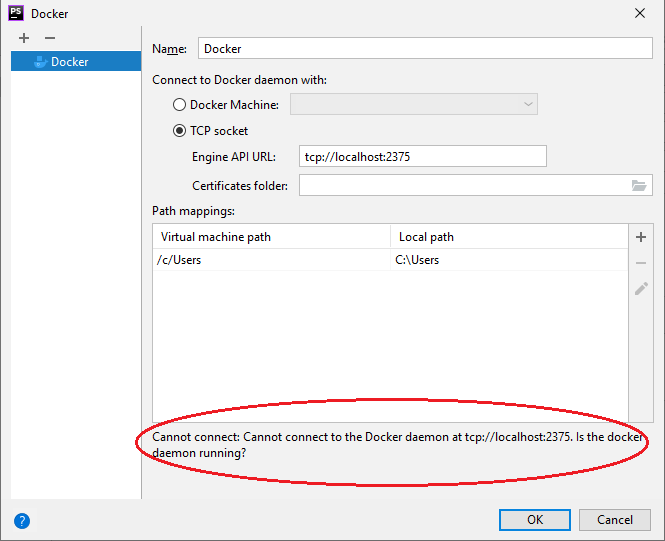
To fix this, open Docker Desktop and check if there is any problem with the docker daemon. Also, make sure that the daemon is exposed at port 2375 as described in the “Prerequisites” section earlier in this post.
Another problem can happen when PhpStorm fails to start the service containers with an error message like this:
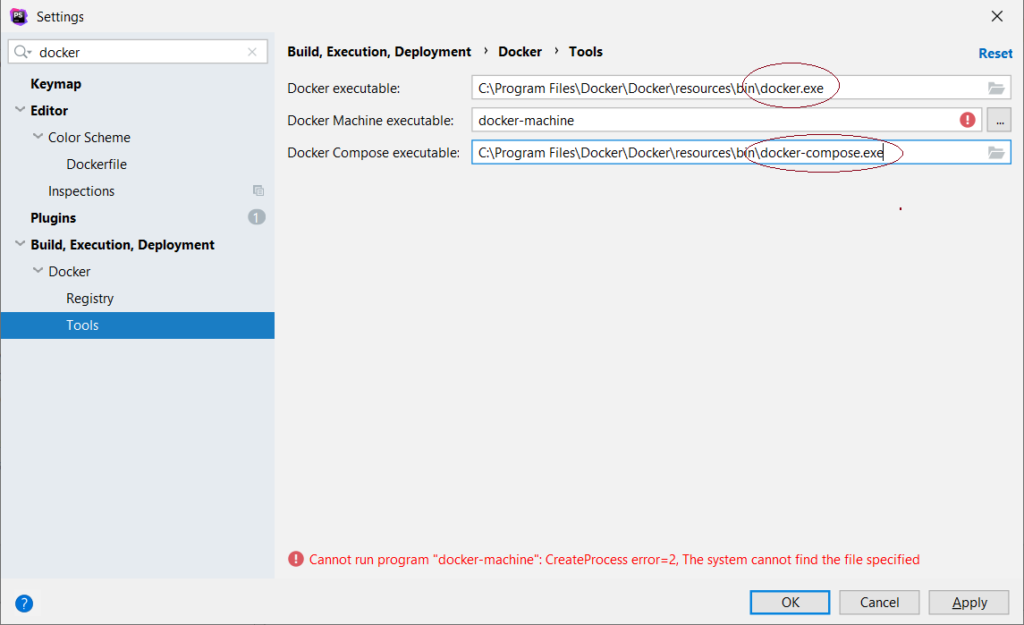
Failed ... com.intellij.execution.process.ProcessNotCreatedException: Cannot run program docker-compose CreateProcess error=193, %1 is not a valid Win32 application
This problem happens on Windows machines and the reason is that the tool settings for the Docker executables lack “.exe” extensions in file paths. Simply adding the missing extensions should solve it:
Starting the Service Containers
Once the Run Configuration is created, we can build the images and start the containers by clicking the run button in the IDE toolbar. The deploy log in the IDE will show this:
Deploying 'Compose: docker-compose-local.yml'...
"C:\Program Files\Docker\Docker\resources\bin\docker-compose.exe" -f C:\__projects\docker\wordpress_xdebug\docker-compose-local.yml up -d
Creating network "wordpress_xdebug_app-network" with driver "bridge"
Creating volume "wordpress_xdebug_dbdata" with default driver
Creating db_blog_xdb ...
Creating wp_blog_xdb ...
'Compose: docker-compose-local.yml' has been deployed successfully.
Alternatively, this could be done from PowerShell running in the privileged mode:
cd <project directory>
docker-compose -f ./docker-compose-local.yml up -d --build
Wait a minute before testing the project in the browser. The db service takes some time to launch the MySQL service and start accepting connections. You can follow this process using the logs command:
docker-compose -f ./docker-compose-local.yml logs -f
Wait until the log shows this line:
[System] [MY-010931] [Server] /usr/sbin/mysqld: ready for connections. Version: '8.0.20' socket: '/var/run/mysqld/mysqld.sock' port: 3306 MySQL Community Server - GPL.
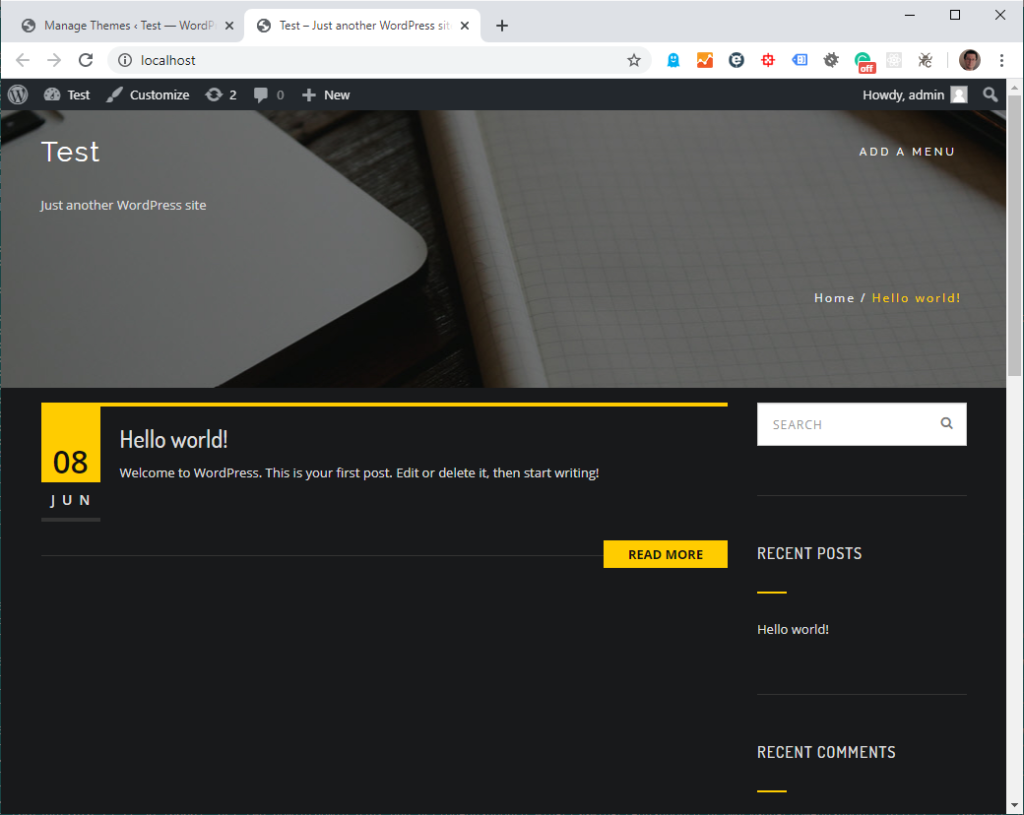
Now, go ahead and open the http://localhost. You will be greeted with the familiar WordPress installation wizard. Finish it and log into the admin area. There, activate the BeOnePage theme. Now your blog will look like this:
Debugging
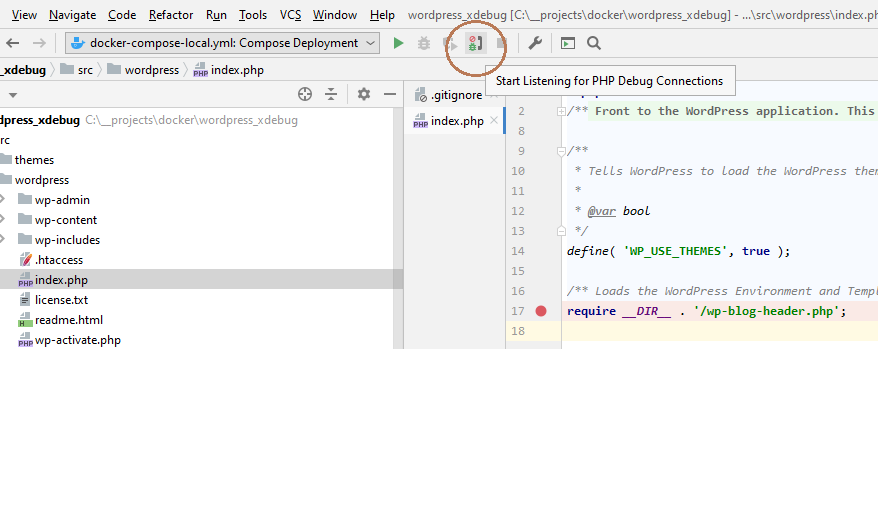
We are now ready to start the first debugging session. Open the core WordPress index file located at src/wordpress/index.php and place a breakpoint in the last line
require __DIR__ . '/wp-blog-header.php';
Now, in the IDE toolbar, click the “Start listening for PHP Debug connections” button:
In your browser, activate the Xdebug Helper:

Reload the index page and make sure the execution stops at the breakpoint. If yes, try stepping in and go a few levels deeper. Test breakpoints in other locations in the core files directory.
Possible Problems
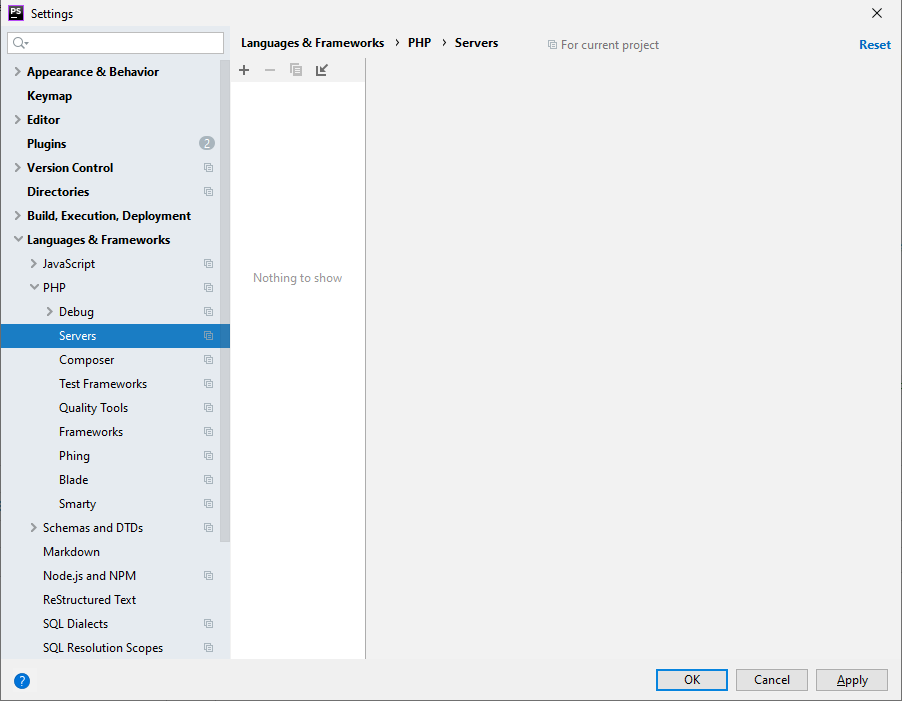
It can happen that the breakpoint is missed, or there are Xdebug connection errors like this appear:
<em>Cannot accept external Xdebug connection: Cannot evaluate expression 'isset($_SERVER['PHP_IDE_CONFIG'])'</em>
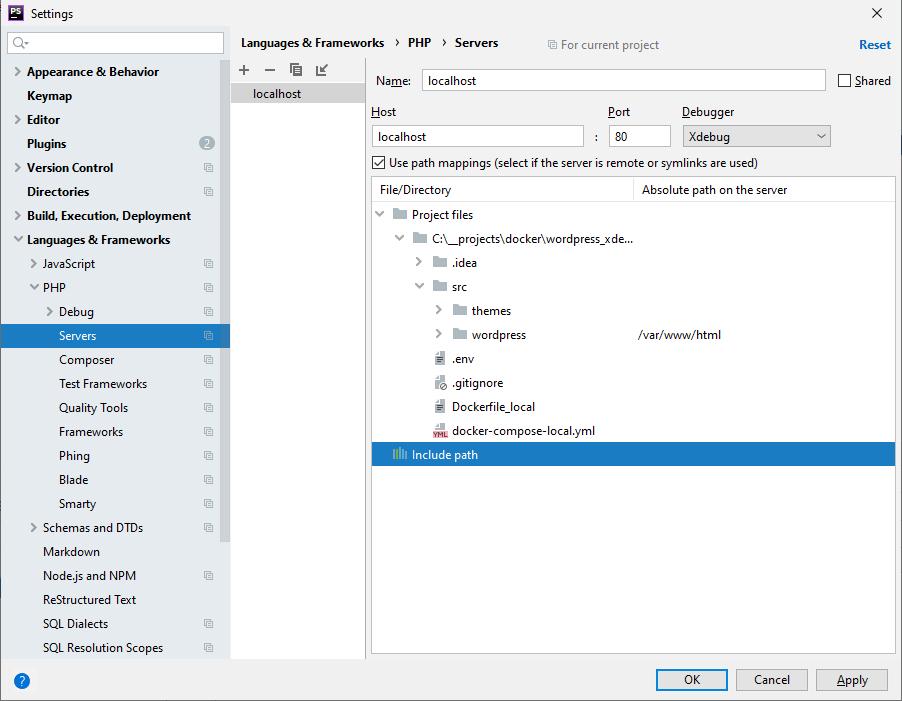
In this case, open the project settings and under “Languages and Frameworks” > “PHP” > “Servers” delete all server configurations. They will be automatically fixed and recreated the next time you start debugging:

Debugging the Custom Theme
Now that the core files debugging works, we need to try debugging the custom theme files located at /src/themes/beonepage. To enable this debugging simply add a mapping to the theme directory:
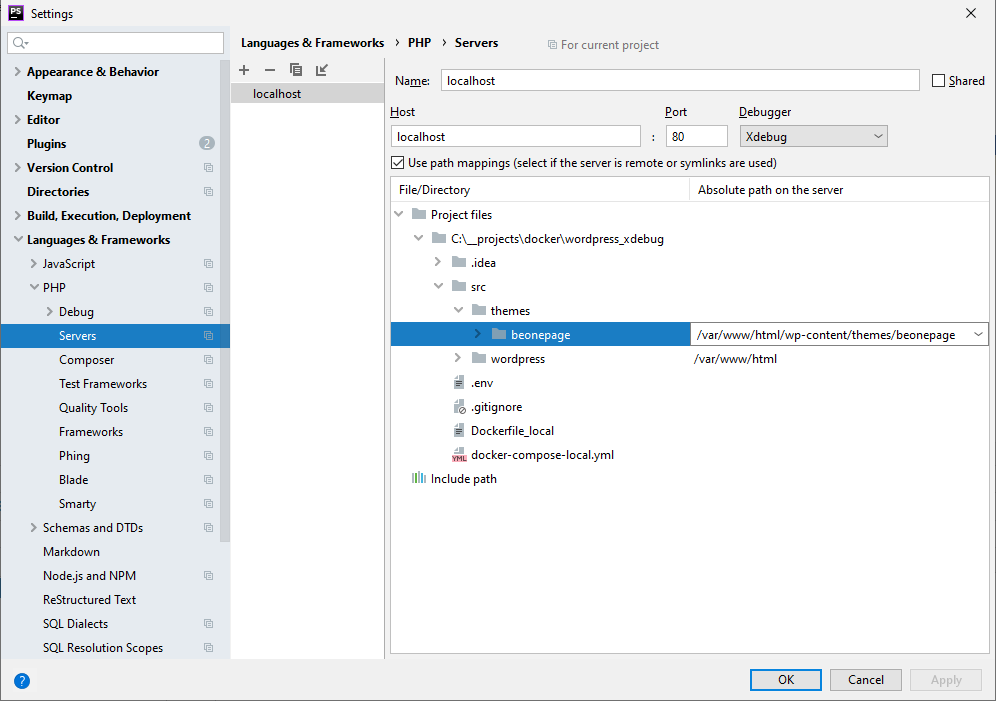
Now, the breakpoints in the theme files should work as well.
Next Steps
In this tutorial, we showed how to enable debugging of PHP files in a dockerized WordPress project with PhpStorm.
Once the project is ready for deployment, you will have to work out a way to bring the theme modifications to the production environment. The volume mapping we used in the docker-compose service configuration will not be necessary for a live container so you may need to create a Docker file for the production version. You can find more information on deployment Deploy Containerized WordPress Websites with GitLab and Nginx-Proxy
0 Comments